What Do I Know About My God?
A few years ago, our ladies Bible study began a study called "What Do I Know About My God" by Mardi Collier (http://www.bjupress.com/product/239343). I based my personal devotional journal on the format described in this book. I enjoyed going back and reading through the categories and the verses that I had listed in each. That was until I lost my book. I was not happy that I couldn't find it but finally gave up looking for it (after looking in 3 different states).
Late last year, I was scrolling through videos on YouTube and ran across one by Yoliebean on making a perpetual calendar (http://www.ustream.tv/recorded/11275426). That's when I discovered how easy making books can be. Now I had the perfect way to make my new devotional journal.
Before we get to the project, lets talk about chipboard. I save chipboard that comes in packages of papers, forms, etc, so I don't have to buy it. I have 2 awesome clerks at work who save the cardboard in the packages of forms when they open them up. You could even cut apart a box for this project. The key here is strength as you will probably be using this book often.
Here's what you need to get started to make a book like the one pictured:
2 pieces of chipboard
Coordinating papers (I used papers from "Life's a Journey" from K & Company)
Solid papers (from my stash)
Accent Essentials and Simply Sweet cricut cartridges
3- hole punch and eyelet punch/ setter
Adhesive (I used spray adhesive, terrifically tacky tape, a zig 2-way pen, and glue dots)
Lined paper (8.5 X 5.5 inches - I found Office Max brand for .99 cents)
Scoreboard and bone folder
3 Binder rings - 1-2 inches (office supply store)
Embellishments (I found the round paper clips on clearance at an office supply store)
Instructions:
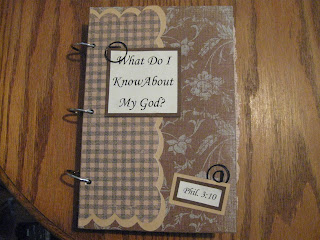
Cover - cut 2 pieces of chipboard and 4 pieces of patterned card stock or paper to 9 inches high by 6 inches wide. Run a line of tape all the way around the edge on the wrong side of each piece of patterned paper. Spray chipboard with spray adhesive and attach patterned paper. Using double adhesive while help keep the cover intact with all the work you will be giving your book. Repeat, covering both sides on each piece of chipboard. Cut designs for your taste to decorate the front of your book. I used the Accent Essentials Cricut cartridge and my Design Studio to size and cut a scalloped square out of solid tan colored paper with a slightly smaller one in the checked paper. I then cut it down the middle with my paper trimmer, placing the straight edge against the edge of the book. Using Microsoft Word, I printed my title with the Monotype Corsiva font at 40pt and the verse at 26pt on a piece of cream colored resume paper. I mounted these on brown card stock. I also mounted the reference on a piece of tan card stock. I used glue dots to adhere these to the front of the book. Using a piece of your lined paper as a guide, mark hole placement on each cover piece. Use a hole punch or eyelet punch to cut the holes (my 3 hole punch wasn't strong enough to handle this job). Embellish as desired. I printed my name and phone number on another piece of paper, matted it in brown, and adhered it to the inside front cover. You can see placement on the last picture (my phone # is covered with a piece of paper for obvious reasons). I DO NOT plan on losing a second book!


Divider Pages - Using coordinating card stock, cut your dividers to 8.5 inches X 5.5 inches (or the same size as your lined paper). I made 21 dividers because I placed 2 letters on some pages (like y and z). I may add additional dividers in the future if I decide to add sections such as a prayer journal, sermon notes, etc. Set your 3- hole punch to match the holes in your lined paper and punch holes in each page. Use the Simply Sweet Cricut cartridge set at 1 inch and cut your alphabet tabs out of patterned card stock and the blank tags out of solid colored card stock. Adhere to divider pages using the Zig 2 way pen, backing each alphabet tab with a blank solid tab. **Don't have a Cricut? No problem. You can purchase adhesive tabs to use. You can even be creative and make your own tabs.**

Pocket Page - I wanted to add a pocket page to place pens, my prayer list, and a stack of sticky notes for when I want to jot down a passage to be added at a later time. The other side holds prayer cards from missionaries. I used the pocket page from Yoliebean as posted in the link above. To make - Take a 12x12 piece of double-sided card stock with the right side facing up. Score at 6 inches. Turn paper 90 degrees and score at 8 inches. Fold paper at the 8 inch score line, creasing with bone folder. This should form a 4 inch pocket. Unfold and apply adhesive on each edge (this is where you see the rings above). Re-fold, forming the 4 inch pocket. Fold the paper at the 6 inch score line and crease. Open up page and run a line of tape along the bottom of the page and the outer edge on the wrong side of the paper. Re-fold, forming a page that is 6 inches wide and 8 inches high. I did not tape the top, leaving the option of having an additional pocket if I need it in the future for larger pieces of paper. This page ends up being a different size than the other pages of the book. I chose to leave it this way because I wanted this size of pocket so I could place my sticky notes on the bottom of the pocket. It could be tweaked if you wanted the size of the pocket page to be the same size as the dividers. Find the center point on the un-creased edge and punch 3 holes.
Assembly - Use binder rings to form your book with your covers, divider pages, pocket page, and lined paper. As I need to add more sheets of lined paper, I can purchase larger binder rings.
As a variation to this book, I made a more masculine one for my husband. I found striped paper and paper with his initial at my local scrapbooking store. I then found a round initial sticker that fit in a brass colored sticker holder to use as an embellishment on the front cover. I used the reference to his favorite Scripture verse. I cut both the alphabet and the blank tags out of solid colored card stock using his favorite colors.
Do you plan on making one? I would love to see it.


Comments