Posts

Showing posts from August, 2011

You Are Loved Card

Image
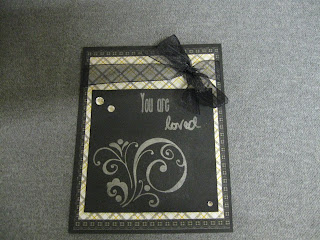
Here is a quick card I made.  This was the first time I used Ranger Perfect Pearls and I was excited to try them out.  Lets get started: Tools -  Stamps - "Amazing You" set from K. Andrew Designs Stamps - "Monarch" set from Inque Boutique ATG Adhesive Paper Trimmer and bone folder Supplies -  DCWV - Lemon Flower Matstack (I chose a yellow/silver background and a black background) Black card stock Pale yellow card stock (scrap from my stash) Ranger Perfect Medium Ranger Perfect Pearls in "Perfect Pearl" Black organdy ribbon (from my stash) Creative Charms gradient jewels - 3 different sizes Outside of the card: Cut a piece of black card stock to measure 11" X 4 1/4".  Fold at 5 1/2".  This will be the base of your card.  Cut a another piece of black card stock to be 3 1/2" X 3 1/2".  Cut a black print mat at 5 1/4" X 4".  Cut the yellow print mat at 5" X 3 3/4". Stamp your imag

Terrific Tools Tuesday

Please check back for this week's feature. I plan to have it posted by Thursday night or Friday morning. Have a great day.

Super Supplies Saturday - Episode #4 (Goosebumps)

Image
This week, I show you how to use Goosebumps to add texture to a tag.  I thought this product was a lot of fun.  Thanks for watching.

Stamps, Special Request, FEAR

Image
In this video, I show you some new products I have purchased and make a special request of Kristal of K. Andrew Design.  I also discuss FEAR.

Card Exchange Club Cards - Male Birthday

Image
This video highlights the cards made by the other ladies in my Card Exchange Club.  If you would like the tutorial of my card for August, click here .

Terrific Tools Tuesday - Episode 4 (Cuttlebug)

Image
This week's video is a few hours late.  I hope you enjoy this video about the Cuttlebug. Thanks for watching and have a great day!

You Are Not Alone Encouragement Card

Image
Today my 16 year old daughter had to have an MRI on her head as well as blood work.  I made this quick little card for her and gave it to her just before leaving for the hospital. This little card went together in mere minutes.  The best part is that all the paper was taken from my scraps.  To get started, you will need the following: Card base - piece of card stock cut at 6" X 3" and scored and folded at the 3" line White card stock - cut 2 3/4" X 2 3/4' Brown/ pink scrap - cut flower at 1 1/2" using the Accent Essentials cricut cartridge Brad (mine is from "Fancy Pants") and paper piercer "Amazing You" stamp set (K. Andrew Design)* Archival ink - print brown Zig pen - brown ATG Instructions: Cut the flower and curl up the edges using your paper piercer, paintbrush, or some other round tool.  Using the "You are" and "Not Alone" stamps, stamp your image using Print Brown Archival ink.  Pierce a hole

Western Day Bookmarks

Image
This video is of the bookmarks I made for our church's "Western Days".  I used the "Just Because Cards" Cricut cartridge to cut the boots.  Today was "Round Up Sunday" and it was a great day.  Please enjoy the project and thanks for stopping by.

Dress Form Birthday Card

Image
I made this card for a lady in our church who is celebrating her birthday sometime soon.  The ladies of our church have a secret sister program and I told Christine's secret sister that I would make a card for her.  Christine, if you see this, remember that I am not participating this year.  I often make cards for others to give :).  The mat on the inside of the card actually forms a little pocket for a gift card, check, or cash.

Card Exchange Club - Male Birthday

Image
This month's card exchange is coming up on Wednesday.  I finished this a little ahead of time as I begin a long work week tomorrow and wanted to be sure this was done.  Tim Holtz has perfect supplies for making masculine cards.  I used the following Tim Holtz products: Distress Ink - Tea Dye Distress Tool Retro Grunge paper stash pad "The Journey" stamp set "Artful Muse" Alterations embossing set I also used the Cuttlebug, ATG, craft colored card stock, and a stamp set from Stampendous. Hope you enjoy the video.

"My Anti-Poison Kidney Kit"

Today has been a very long day.  Dad was scheduled to be at the hospital at 9am this morning for placement of his peritoneal dialysis port.  Unfortunately, his platelet count was low and the MD did not want to have surgery until platelets were available "just in case"  It was around noon before he went back for the procedure and then he had a 4+ hour recovery time following a nearly 2 hour procedure.  I'm not used to spending that much time at the hospital without getting paid for it - LOL.  Everything went very well and he is home.  Thanks so much for your prayers. When my mother-in-law removed his wallet from his clothing, she found this little poem that he wrote yesterday.  I thought I would share. My Anti-Poison Kidney Kit Elmo Parish 8/10/11 I had an Anti-Poison Kidney Kit embedded 'neath my skin, Now when I want the poison out, I merely plug it in! And as I dose or soundly sleep, my APKK toils To rid my body of toxic power, restoring strength in hours. An

Terrific Tools Tuesday - Episode 3 (YourStory)

Image
This week we explore the YourStory by Provo Craft.  I have used this tool often to make books.  Join me as I explore some of the things this great tool can do.   To make the book mark I used lavender paper from my stash and printed one of the digi's from Dee's Bugaboo Boutique .  I adhered it to a scrap from Doodlebug and added the flower pitcher from Kate's ABC's left over from a Card Exchange . You can learn how to make the "Mommy Quotes" book by clicking here and here . The shopping lists will be featured in a future post.  I used DCWV - Nana's Kitchen stack to make them. This is a little journal I made with the YourStory before I started blogging.  I used the Cuttlebug and Cricut Create-A-Critter to embellish the front.

Super Supplies Saturday - Episode #3 (Tim Holtz Inks)

Image
In this week's episode, we explore 2 different Tim Holtz inks - Distress Ink pads and Alcohol. In this second video, we make a cute butterfly card using the paper we inked with the alcohol inks.  I combined 3 stamps from the "Amazing You" set by K. Andrew to make the sentiment for the card.  After stamping the sentiment, I set the stamp aside and finished the video.  I then took the snapshots of the card before remembering that I hadn't cleaned my stamp.  I figured the black ink would now be a permanent part of the stamps.  Boy was I wrong!  They cleaned beautifully.  I don't think I have ever had a stamp sit for that long without being cleaned and come completely clean.  This is just one of the reasons that I'm really going to enjoy these stamps! I hope you enjoyed these videos.  Thanks for watching.

Flower Gift Tags

Image
In this video, I show you how to make some quick gift tags using the Accent Essentials Cricut cartridge and circle hole punches.  I also used the Cuttlebug with the Swiss Dots folder.  Thanks for watching and check back for more projects.

Terrific Tools Tuesday - Episode 2 (Martha Stewart Scoreboard)

Image
In today's episode we explore one of my favorite tools.  I love the things this has helped me do.  Thanks for watching.

Card File Box - Part 2

Image
In this video we finish the file box.  Check back later for the lid and the insert videos.  Thanks for watching.

Card File Box - Part 1

Image
In this video, we begin altering a box to turn into a handmade card file.  Thanks for watching and keep checking back for the completion of the project.