Posts

Showing posts with the label Cricut - From My Kitchen

Christmas Journal 2

Image
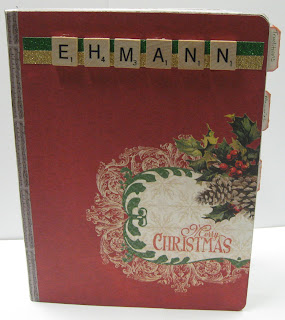
I know that Christmas is long over and packed away.  However, I wanted to post just one more of my Christmas projects.  I have shown you 2 Christmas journals this year.  The first was a very detailed journal that I made for my own Christmas journaling.  The second one was a really small journal that is something that you could toss into your purse.  I made a bunch of these for co-workers.  Today, I am sharing one between the 2.  It will take a little time to make, but I think its worth it.  I have made several of these throughout the season and still have several more to make.  Let's get started. For this particular journal, I used the following items: Composition notebook 14 pieces of cardstock (cut 4 at 9 3/4X 7 1/2 and 10 at 9 3/4X 7 1/4).  For this one, I used the Recollections Botanical Noel.  This is a stunning paper pack. Teresa Collins "Christmas Cottage" tape American Crafts glitter ta pe Scrabble tiles Cricut "Fr...

Christmas Inspirations Blog Hop - Christmas Journal 2012

Image
Welcome to the 3 Girl JAM - Pinque Peacock Bloghop.  If you have hopped over from Scrappin' Madge , you're in the right place.  If you just stopped by to visit my blog today, be sure to start at the beginning with 3 Girl JAM .  There are some great prizes being offered plus you will be able to link up a project as well.  Why?  Because this blog hop also kicks off the current challenge on the 3 Girl JAM Challenge Blog.   I am so excited to be sharing my project today because I put a lot of "me" into it.  This is a special project that I made for me and for my family for years to come.  I plan to just give you a list of products I used.  The video will walk you through the book to show you what it's all about.  I've already started writing in my book.  I hope it inspires you to start a Christmas Journal of your own.  Let's get started. To start with, I grabbed the Winter Bundle from 3 Girl JAM and stick pins from ...

Let's Got Those Stamps Organized!

Image
Welcome to my 3 Girl JAM post.  Did yesterday's post inspire you to get your stamps organized?  If you missed the post, please click here.   Now that the stamps have been all stored alphabetically, I needed a way to be able to find what I have.  This video ( click here ) started me on the process of getting organized.  I won't lie and say it was easy.  Indeed, it took a lot of time to get this set up the way I wanted it, but I am so pleased with the results.  I should be able to utilize what I already have now that I can quickly find those images.  So without further ado, here is my organizer: Of course I needed a few supplies to get started: 3 Girl JAM "Antique White" ribbon which can be found by clicking here . DCWV - Lavender Chateau Mat Stack Chipboard 2 large rings PaperTrey Ink - vintage cream card stock Archival black ink White card stock (lots and lots) Lavender card stock Crop-A-Dile and eyelets Cricut - From My Kitchen ...

How Do I Store My Stamps?

Image
Hello every one.  I have a special project to share with you today.  I have been having difficulty keeping track of my stamps.  Does anyone else have that problem?  This is actually the first in a 2-part series on stamp organization.  After watching several YouTube videos and asking advice from the 3 Girl JAM design team, this is the system I finally came up with to work for me.  I am really pleased with the way that it turned out.  I had a plan that I could work with when I was directed this idea by Sarah Hamer Designs.  I took my original plan and added the card stock dividers similar to her tutorial to create my system.  I ended up going from this mess... To this... I picked up the smaller basket from a thrift store for $1 I think and had to order 1 package of 5 1/2" X 8 1/2" dividers.  I had everything else on hand.  I'd say that is a pretty good start, wouldn't you?  Please watch the video to see exactly how mad...

Thank You Notes #2

Image
Good morning everyone.  I've been so busy that I've not had much time to craft and even less time to blog.  Let's just say that my plate is currently VERRRRY full.  That's OK because it will pass. One of the things that I have been working on lately is a Stroke Awareness Campaign for my community.  WOW!  It's keeping me hopping.  I plan to dedicate a post soon to Stroke Awareness so keep an eye out.  There's a lot we should all know about stroke! As you probably know, Saturday was National Scrapbooking Day!  I must say that it was the BEST one I have ever had.  Not because I was able to scrapbook, but because I spent most of the day with my daughter.  She even wanted to go a scrapbooking store (which she hasn't been interested in for awhile).  By the time the day was done, we had also gone to JoAnn's and she bought fabric to recover a 3-ring binder and start her next scrapbook.  We also re-arranged the old family room to make...

"Stopping By To Say" card

Image
Hello my bloggie friends.  I trust today finds you happy and resting in the joy of the Lord.  I will admit that the main thing I have accomplished today is keeping my pajamas warm.  As close as I can figure I worked around 55 hours in the last 4 days and am exhausted!  I did manage to squeeze in a card in those few days that I wanted to post for you. Add caption I used a sketch from Erica's Craft Room for her current challenge.  I just wanted to make a simple invitation for dinner on Easter.  This sketch was perfect for it.  I'm also really excited to have found the postage stamp cut on Elegant Edges.  I have wanted to use this cut, but only thought that I had it on an Imagine cartridge.  Using mycutsearch.com, I discovered that Elegant Edges had it as well.  Woot woot!  I see other cards with this cut in the future. Supplies: Vintage Cream cardstock - Paper Trey Ink (8 1/2" X 5 1/2" - scored at 4 1/4 to form A2 card) Yel...

Sketch Inspired Thank You Notes

Image
Today I have a tutorial for a set of thank you notes that I made.  My thank you note stash was dangerously low and I need a whole lot of them right now. I used Sketch #112 from Operation Write Home to create these pretty cards.  This is the first time that I have used a sketch designed by someone else and I enjoyed seeing the results. Operation Write Home is an organization that sends cards to deployed soldiers to send back to their families.  Isn't that a neat idea?  You not only encourage a soldier, but you also encourage his/her family.  We sometimes forget the sacrifice the families make so that their loved one can protect us.  For more information on Operation Write Home, simply click on the sketch above to be linked back to their home page. Of course, I had to use K. Andrew Designs stamps to complete this project.  I used "Owly Hoo" and "Scripture Sayings".  Simply click on the stamps below to find out how ...

Best Dishes Cookbook - Vegetables

Image
Drumroll... This is the final page (though not the final post).  What cookbook would be complete without the veggies?

Best Dishes Cookbook - Salads

Image
I didn't really find any embellishments that I wanted to use for a salad, but I found some fruit.  Just think fruit salad if you make this page.

Best Dishes Cookbook - Poultry

Image
This is probably one of the more time consuming pages that I made for the book.  However, I think it was worth it.  Following the Cricut chart in the post will speed up the process for me the next time I make a book.

Best Dishes Cookbook - Meat

Image
This page was super simple and went together fairly quickly once I had a plan

Best Dishes Cookbook - Desserts

Image
When this page is finished, we are half way through the page dividers.  This page looks like it took a lot of work, but it is actually very simple because the page was pre-printed with a baking design.  I based my cuts around the design to make sure everything was placed where I wanted it to be.

Best Dishes Cookbook - Casseroles

Image
We're moving right along on our cookbook now.  Casseroles - those one dish wonders that we all have in our lives.  I must admit that I don't make many casseroles because they aren't my husband's favorite.  However, there are some that he likes and I will add those to my book when I get around to making it.  Of course I want a cute page/divider even if there won't be many recipes in the section.  I think this one fits the bill.  Silver stickles and the embossed paper add a little bling to this otherwise simple page.

Best Dishes Cookbook - Bread

Image
Who doesn't love fresh bread?  The way it makes my house smell on a cold day is wonderful.  Unfortunately, we don't get fresh bread very often, but when we do, we sure enjoy it.  I'm hoping this next page divider takes my sister back to that warm feeling of fresh-baked bread.

Best Dishes Cookbook - Beverages

Image
I think this may be one of my favorite pages in the book - the beverage page.  Why?  Because I love a good latte and this is the background of this page.  Let's get started.

Best Dishes Cookbook - Appetizers

Image
When making this book, I decided to put the categories in alphabetical order.  From there I tried to choose paper to match the type of food the page would represent.  In some cases, this was very simple.  In others, it was more complicated.  Nana's Kitchen is not double sided paper, so I chose 2 different papers for each page/section divider.  This also made each divider sturdier.  I did not embellish the back side of the page because I wanted to avoid the extra bulk that would create.  I also did not adhere the front to the back until the front was completely embellished. On to page 1...