Posts

Showing posts from July, 2012

100 Follower Giveaway

Image
***This post will remain at the top of the page until 100 followers is reached.  Scroll down for the latest projects and more.  Thanks*** Hello everyone.  I hope you are having a great day.  Mine was pretty good.  Today I reached 80 followers.  I am blessed to have each of you following my blog.  Thanks so much.  For several months now, I have been planning on a nice giveaway when I reach 100 followers.  I thought I would announce it today.  Once I reach 100 followers, I will post the giveaway dates and details.  So tell your friends to come over and follow! Have a great day!

Beautiful Day Altered Bag

Image
Ever wondered what to do with paper shopping bags?  Well I say, "Alter them".  In this video I walk you through how I turned a brown bag, scratch paper, a vellum sentiment and 3 different colors of ribbon from 3 Girls Jam into a beautiful gift bag.  The bag is completed with a word art tag from Tim Holtz. Here's a sneak peek. Isn't it beautiful?  I think it is.  Plus, it can be recycled for a future gift.  Thanks so much for watching.

Thrifty Haul

Image
I'm baaaack.  Well. I'm sort of back.  In my last post, I discussed ways to save money to stock a crafty space.  In this video, I show you some items I purchased over the last few days.  You really can find fun products at greatly reduced rates.  Thanks so much for watching.  Don't forget to tell your friends about our 100 follower give-away.  We need just 6 more followers before the big give-away!  Have a great day. Check back soon for a fun project!

How do I... Afford to Stock My Craft Room?

I know it's not quite time for the next "How Do I?" post, but I received an email today that I just couldn't resist telling you about.  When trying to figure out how to let you know, I decided to expand it into this week's post.  ***Disclaimer - I do not work for any of the places I mention below, nor am I currently receiving compensation for these ideas.*** A quick glance at the local craft store can be overwhelming to the new crafter.  Some items look really inexpensive and make you think you can grab a whole bunch... until you go to pay.  Other items look out of bounds from the get go - think electronic die cutting machine.  So how do you begin to afford it all? * My first important piece of advice is don't ever spend more than you can afford.  Yes, I'm speaking from experience here.  God expects His children to be wise stewards of His money.  This is something that I have failed at and have to be conscious of when I am shopping.  One hint is to be

"We Will Miss You" Card

Image
It's unfortunately time to say good-bye to a great co-worker.  Her husband is being transferred to another state and we are going to miss her.  Melissa has a very quirky sense of humor and so I wanted to make a card to reflect that.  This is definitely a one-of-a-kind card that is fitting only to Melissa, but I hope you can use some of the techniques to make your own card. I have never attempted a pop-up card before, so to start I had to find out how to make the die cut on the inside POP.  I found this video on YouTube (click here ), and decided to give it a try.  This is a basic pop- up card though the original tutorial I found had much more complicated techniques also. I started with the inside of the card because if it didn't work out correctly, I wanted to be able to start all over again without re-doing the outside.  Thankfully, it didn't come to that. My bus was cut from Doodlecharms and is cut at 3 3/4" using the flip feature.  I needed the flip feature

Melissa's Envelope

Image
Hello everyone.  Today I have an envelope to share with you.  An envelope you say?  Absolutely!  You see, I made a card for a special lady that we are saying farewell to (for awhile).  My co-worker Melissa is moving away, but we hope she will be back in a few years.  In the meantime, we wanted to show her how much we would miss her in the ER so we pooled our money for a gift and I volunteered to make a card.  Watch for the card soon.  It's one of my new favorites!  To wet your appetite, here is the envelope: The paper that I used was from the "My Family" pack from Fancy Pants.  These colors are absolutely gorgeous!  I felt like I could put lots of layers on the envelope since the card would be hand delivered.  Here's the video: Thanks for watching and check back soon for the card!

How do I... Start using the Cricut Craft Room?

Image
In today's "How Do I?" segment, we are going to discuss the Cricut Craft Room.  This segment was prompted by a question from one of my followers about combining fonts.  I have not yet decided how far I will take this series, but I did want to at least introduce anyone who hasn't yet learned out to use it to the basics.  I must admit that I held out for awhile because I didn't think that I really had time to learn to use another new program.  I was so wrong!  It is pretty simple to use (I think its easier that the Design Studio) and there's so much you can do with it.  Please bear with me because the video is lengthy. So what do you think?  Ready to give it a try?  I hope you do.  What would you like to see on a future "How Do I?" segment?  More Craft Room?  Something else?  Please let me know! Have a supercalifragilisticexpealadocious day!

Hugs and Kisses Candy Bar Wrapper

Image
I have to say that the response to the 100 follower giveaway has been surprising.  Thanks so much everyone!  Just 10 more to go and I will announce how to enter and the closing date.  Hint... If you're a follower, you're already part of the way there.   It will be easy :-).  Thanks to everyone who has posted on Facebook and blogs.  This is such a great group!  Click here to find out more. In the meantime, how about a project?  This was so super simple.  You could use this idea to let someone know they're special in so many ways.  I chose to send it to my daughter who didn't come home from camp last weekend.  She needed some music sent with her brother who is also at camp this week (Did I mention that I'm childless this week?), so I slipped it into the bag with the music and other stuff I sent. I used a piece of lime green paper from my 8 1/2X 11" stash to cover the candy bar.  The "Its Valentines" stamp set from K. Andrew Designs held the pe

Man Pleasing Chicken

Image
I'm back with another Pinterest recipe.  Can you say YUMMO?  This was so fabulous! Click here  to find the original recipe.  I served it with rice pilaf and green beans.  It was really simple to make and absolutely delicious.  I think the next time I make this, I will make a double batch and put 1/2 in a freezer bag for a future meal.  You've gotta try this.  You'll be glad you did.  Thanks for stopping by and come back soon for more projects and more.

"Best Ever" Birthday Card

Image
I wanted to enter one more card to the Link Up Party - Beautiful Bows at 3 Girl Jam.  To see all the great projects linked up, please click here .  Have you figured out how much I like their ribbon and new bow maker?  They are fabulous! Today's card is a masculine birthday card.  Yes, you heard right.  It's a masculine card and I put a bow on it.  It works!  Sometimes you just have to try something to see if it will work out. See?  I told you that you could make a masculine card with a bow!  Isn't the blue background paper gorgeous?  I created that background and you can find out how by watching the video. I used... 3 Girl Jam Crinkle Ribbon - Hot Chocolate Tim Holtz' Life's Possibilities stamp set TPC Studios Birthday Stamps Distress Ink - Antique Linen Versamark Ink Archival Ink - Black PaperTrey Ink - Vintage Cream Card Stock Tim Holtz Coordination Distress paper - blue Card stock - Bark MME Lost and Found (?) paper - brown side Thanks f

Enjoy the Moments Blog Hop Winner

Image
***Drum Roll Please*** Using the highly sophisticated randomHeath.com, we have a winner for the "Enjoy the Moments" blog hop.  Never heard of randomHeath.com?  It's so simple to use.  You take all the eligible comments and write the names on pieces of paper.  You fold them.  Put them in a bowl.  Then you call your 13 year old son to draw out a name.  See what I mean...HIGHLY sophisticated! The winner is: Karen L Please leave a comment with your mailing information.  Since I moderate all comments, I will be sure not to post your information. Would you like to see what Karen won? To start with, let me explain.  My original surprise didn't work out so I finally decided to just order some goodies from Above Rubies Studio.  They were ordered late in the week and I have not received shipping confirmation yet.  With CHA this week, I suspect that my order may be a bit delayed.  I plan to send out the candy as soon as I receive that order.  I ordered the "Th

How Do I...Tie a Bow?

Image
Today we are going to talk about bow tying.  I don't know about you but I struggle tying a pretty bow.  Maybe I should say that I USED to struggle.  A little over a week ago, that all changed.  How, you ask?  Well, I could say that I grew a third hand because that would undoubtedly solve the problem.  I would look a little strange, but maybe I'd have pretty bows.  I could also tell you that I finally developed better coordination, but as old as I am that's unlikely. (You should see me try to do aerobics.  It's kind of hard to keep your heart rate up when your watching the teacher with your mouth hanging open and saying "huh".) Since I'm not likely to grow a third hand and greater coordination is also unlikely, I was very glad to see the new bow maker from 3 Girl Jam.  If you've been watching my videos for awhile, you know how much I like the crinkle ribbon from 3 Girl Jam.  It is soft and beautiful.  The colors are vibrant and it feels fabulous in yo

Purse-onality Coasters

Image
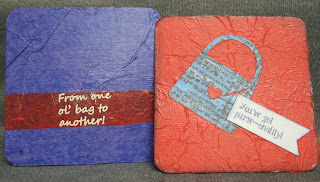
My Miche party was fun.  If you missed out and would like to order, there's still time.  Just click here and find me (Cheri - 7/12/2012) in the side bar and place your order.  They are having some great sales for their 5th anniversary which you can find by clicking here .  Please be aware that these specials do not include bases.  They are just accessories and shells.  You would need to order your purse base separately.    These are still fabulous deals! I made these coasters for all who attended.  I hope you enjoy the tutorial.  I used Create-A-Critter and stamps from Fashionable friends by K. Andrews designs.

It's Miche Time

Image
Miche?  What in the world is Miche? Let me go back a bit and explain.  A couple of years ago, my niece and one of our friends told me about this line of purses / handbags by Miche.  They explained that you buy a base and then that you could buy covers to change out the style and colors.  I didn't quite get it (as I'm sure you're not either right now), so I just kind of let it go.  Time travel to several months ago and I am chatting with someone and she hands me her Miche business card.  Again I set it aside and don't really do anything with it.  Time travel a bit further to March and my niece is visiting.  I take a good look at her Classic bag and decide this whole Miche thing is worth checking out.  I asked my family for one for Mother's Day and Bam!, I'm hooked. Time travel one more time to today and I'm having a Miche party.  It is going to be fun!  I even made some cute coasters to give to everyone who attends.  Here's a picture, but I'm having

Enjoy the Moments Blog Hop

Image
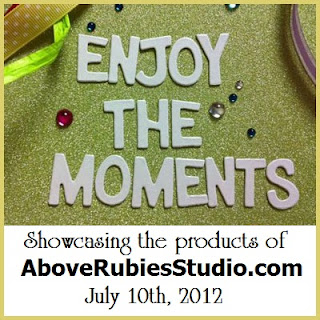
Hello!  Welcome to the Enjoy the Moments Blog Hop.  If you are coming from Java Jen Creations then you are in the right place.  If you just happened to be visiting my blog today, be sure to start at the beginning by clicking here . I am so happy you chose to join me today.  I am pretty new to Megan Elizabeth's blog and products, but discovered that we have at least one thing in common.  We both grew up singing along with Patch the Pirate .  It's a very small world! When I was looking around on her blog and in her store, I knew that I wanted to try her Paper Layerz paper.  I also picked up some of her adhesive.  You will see me use both in today's project.  I decided to post the video in 2 segments so that it wouldn't be one very long video.  I also did something that I have NEVER done on a video before in the second one.  Curious? After I finished the video, I decided to add faux stitch marks around the outside and the inside of the card using a black zig

Enjoy the Moments Blog Hop Tomorrow

Image
Don't forget the blog hop tomorrow.  I think it will be fun!  Here's a sneak peak of what I plan to show you.

Lace Bow Anniversary Card

Image
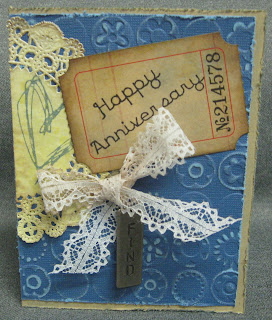
I trust this finds you all well.  I wanted to share this card with you.  I love the old fashioned feel of this one.  I used Distress Ink (Faded Jeans, Walnut Stain, Black Soot), the Heartfelt stamp set, distress paper, tickets, and a philosophy tag from Tim Holtz.  I used "All in the Family" by K. Andrew Designs, a doily sprayed in yellow shimmer spray, and lace from my stash to help complete the look. The card base was made from PaperTrey Ink Kraft cardstock and the inside finished with more tickets.  Please watch the video for more information.  Thanks for watching and have a great day! I am entering this in the 3 Girl Jam - Beautiful Bows Challenge .

Enjoy the Moments Blog Hop - 2 Days Away!

Image
I would just like to remind you that the Enjoy the Moments Blog Hop featuring Above Rubies Studio is almost here! It is scheduled to begin at 12:00 on Tuesday afternoon.  I hope you have time to stop by and see some fun projects.  Have a great day!

How Do I... Store my Cuttlebug, Sizzix, & Spellbinders?

Image
Welcome to the next "How Do I..? " segment.  I trust you are having a great day!  I decided to make a video for today's segment.  I hope you find it helpful.  Be sure to check out ScrappyHour09 on YouTube while you're there. In today's video, I show you one my my newest organization ideas.  I hope you find it helpful.  Little by little, I am getting my craft space cleaned up.  I'm also working on my house and yard.  It's a long work in progress! So how about you?  How do you store your dies and embossing folders?  I would love to see your comments.  Thanks for stopping by and have a great day!

Beast & Belle Anniversary Card

Image
I know you don't typically see a "cutesy" anniversary card from me, but this is for a special couple who celebrated their 5th anniversary and "Beauty & the Beast" has special meaning to them. I once again pulled out the Princess paper pad from Hot Off the Press and went to work.  Elegant edges was the perfect cartridge to create my heart mat and my base was made from Vintage Cream card stock from PaperTrey Ink.  The blue paper was from DCWV's Shimmer stack and Sunflower crinkle ribbon from 3 Girl Jam made a beautiful bow.  The little pearls in the corners were made using Ranger liquid pearls in bisque.  The inside sentiment was stamped using a birthday set from TPC Studio.  The video contains full details on how to make the card so I hope you have a few minutes to enjoy it. Thanks for watching and have a great day! I am linking this to the following challenge 3 Girl Jam Beautiful Bows  

Macaroni and Cheese with Ham Bake with a Salad

Image
One of the meals I prepared was this "Southern-Style Ham and Mac Pie" that I found on YouTube.  You can view the recipe by clicking here .  This was a super easy meal to prepare and my husband really liked it.  I made two so that I could freeze one.  It will make an easy meal for my family on one of my work nights. I thought it was "OK", but my favorite part of the meal was the scrumptious salad that I made to go with it.  I want to tell you how I made this easy and delicious fare. Ingredients: 1 bag of Spring Mix salad 1 Roma tomato - diced 1 cucumber - peeled and sliced 1-2 hand fulls of dried cranberries Dried almond slices - to taste Fresh grated Parmesan cheese - to taste Light raspberry vinaigrette salad dressing I tossed everything together in a bowl except for the dressing which was served on the side.  I originally got this idea from a salad kit that I purchased one time.  They used dried cherries, bleu cheese, and a different vinaigrette. 

Happy 4th of July

I would like to wish everyone a Happy 4th of July.  I hope that everyone has a fun, safe, and responsible day!  If not, you're likely to end up where I will be or somewhere similar - the ER.  That IS NOT where you want to be today! I am so thankful for the freedoms we enjoy as Americans.  Even as I see freedoms being taken from us, I still believe we live in the greatest country in the world.  I am thankful for those serving to help keep America free.  I am thankful for a great God who is still in control. Enjoy the day with your friends and family and remember to thank the Lord for the country we live in.  ***As I sat here praying for my country this morning, the Holy Spirit gently reminded me to pray for my president.  It's so easy to get caught up in everything around us that we forget to pray for our leaders.  Our president needs our prayers.***

Ariel Birthday Card

Image
Hello everyone.  I made this cute card for my niece who is a huge Disney Princess fan.  I asked her mom which was her favorite and she said Ariel.  I used paper from the Princess package from Hot Off the Press.  I don't know if its still available because it is a pack I had left over from my store.  The Happy Birthday stamp was from TPC studios.  I stamped the inside of the card with "Today is your day" from the Positive Thoughts stamp set by K. Andrew designs.  Unfortunately, the photo was blurry and I didn't realize it until I had hand written my note.  After the video was complete, I realized that I really needed to adhere the upper left corner of the vellum block, so I found this line of jewels from an unknown manufacturer in my stash.  I think it looks kind of like bubbles.  To find complete directions for the rest of the card, please watch the video. Thanks for stopping by today and have a great day!

Enjoy the Moments Blog Hop

Image
I am really excited to let you know about a blog hop coming up.  This is the first blog hop  I've participated in for awhile and I think its going to be really fun!  There will be an exciting announcement from Above Rubies Studio during the hop as well.  Keep watching for more details.

1st Birthday Cupcake Card

Image
Today I have a fun little card that I made for my niece's 1st birthday.  It was fun to create this card using Create-A-Critter and Doodletype.  TPC Studio's birthday stamps were perfect for the inside. Recipe - Georgia Pacific white card stock for the base DCWV - Nana's Kids Matstack for the polka dot and striped paper DCWV - Summer Days Card Stock for the lime green Scraps from my scrap stash for the cupcake die cuts and pink mat Chianti ink from Color Box Clear glitter glue from Studio G Pink Glitter glue from unknown source The video provides complete instructions. Thanks for stopping by today and have a great day.

Altered Photo Frames

Image
Today I have a really simple project for you.  I did not take pictures of it, but the video is pretty short.  I hope you enjoy it and are inspired to try your own altered frame project. Thanks for stopping by.