Posts

Showing posts from October, 2013

Altered Letter

Image
Good morning everyone.  My favorite type of challenge is an "Anything Goes" challenge because it lets me pair a current project with a challenge.  That is exactly what I did when I made this fun project.  I had signed up for a swap and it fit perfectly with today's 3 Girl JAM "Anything Goes with Ribbon" challenge. My swap partner likes red, bling, diva, and steampunk.  Finding a way to meld these things together was a challenge all by itself.  I hope I was able to pull it off. I started with a large black letter from Hobby Lobby (13" or so) and adhered lace from my stash with Mod-podge.  Despite the fact that the letter looks upside down, it is the correct direction based on the pre-cut hole on the back of the letter. Other supplies: 3 Girl JAM ribbon - Tuxedo Black, Sterling , Dress White Scor-Tape and cardstock scraps for the base of the flowers Hot glue 3 different types of black trim from Walmart and Joann's Recollections and Cr...

Crafty Friends Tag

Image
Good Morning!  I am excited to be guest designing on the KraftieKre8ations blog today.  KraftieKre8ations has so many fun swaps and challenges and I love to play along with them.  You can check out this fun blog by clicking here .  The tag that I am sharing with you is one that I designed to go to one of my swap partners.  I hope she loves it. I used the following items: Shipping tag 3 Girl JAM - Tuxedo Black and Red crinkle ribbon Distress Inks - Barn Door and Black Soot Tim Holtz Ideology - Mini Gears K. Andrew Designs - "Crafty Friends" stamp set Recollections Bling "Made with Love" charm from my stash Homemade red glitter mist I hope you enjoy the video. I am linking this to the following challenge: Simon Says Stamp - Anything Goes Thanks for stopping by today and remember to take some time to enjoy the little things.

Fall ATC's

Image
Good morning 3 Girl JAMmers.  I have mentioned that I love Fall.  I also love ATC's.  Sounds like a perfect combination to me.  Don't you agree?  I thought so. 3 Girl JAM has bundles of ribbon that are perfect for Fall crafting.  The Harvest Bundle , Spooky Bundle , and Seasons Bundle all have those special colors you just might be looking for.  Click on the name of each bundle to find out how you can get some for yourself. I also used the following products: DCWV "Autumn Melody" and "MatchMakers2 Neutral" matstacks K& Company Tim Coffey Autumn die cuts K. Andrew Designs - "Falloween" stamp set Memento Tuxedo Black ink Please enjoy the video. I am linking this to the following challenge: Simon Says Stamp Anything Goes Thanks for stopping by today.  Remember to take some time to enjoy the little things today.

Ideology Tag

Image
Now I know that you're not used to 2 posts so close together, but I really wanted to enter a challenge over at Kraftie Kre8ations.  You can view the challenge here . Challenge Rules: Tag that is at least  6"X4" - I started by cutting a 6.5"X4" piece of light weight chipboard and then trimming it out to form my own tag. Paint - I used Delta Ceramcoat in Light Ivory (3 coats on front and back) Distress - I used a distress tool and roughed up the edges of the tag and the sentiment box.  I then inked the edges of both with Tim Holtz (TH) Vintage Photo Distress Ink. Paper - I used the Tim Holtz Ideology tissue wrap Washi - 3 strips in the upper right corner Sentiment - from TH "Playful Journey" stamp set Embellishments - Recollections flowers, leaves, bling; charm, Prima "Say it in pearls" bling; handmade lace flower, Crystal stickles Ribbon - 3 Girl JAM "Halloween Harvest" Fibers - From my stash Mail to a KK8 ...

Spools & Stickpins

Image
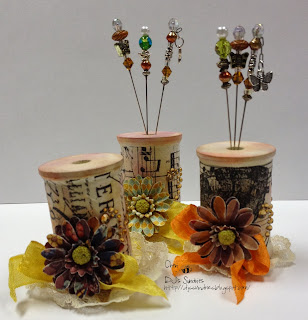
Good morning everyone.  I don't know about you, but I am loving the fall weather.  Today was gorgeous and full of sunshine.  The leaves are falling and wonderful warm color surrounded me.   The warm tones were the inspiration for today's project and 3 Girl JAM provides just the right ribbon to complement that.  The Harvest Bundle is perfect for autumn crafting.  You can find yours here .   In the last year or so, I have really enjoyed making stickpins.  I am gathering quite a collection of these little beauties.  When I have the opportunity to enter a stickpin swap, I try to do so.  When the opportunity came to alter a spool and add stickpins, I knew it would be a lot of fun and I needed to join. Of course, I needed a few supplies to go with the gorgeous 3 Girl JAM ribbon. Spools (from Michaels) Recollections flowers and adhesive rhinestones Tim Holtz Ideology tissue wrap Ripe Persimmon, Gathered Tw...

Filofax Crazy

Image
It's time for me to get organized.  Life is so crazy busy and I have a lot of things to keep track of.  I initially thought I could handle everything with my Outlook and iPhone calendars and avoided this whole Filofax craze.  Now I've jumped in with both feet.  I hope you enjoy the video.  I know it's a bit long. Thanks for stopping by today.  Remember to take some time to enjoy the little things.

Altered Sketch II - Card Share

Image
Recently, I shared a scrapbook sketch that I altered to make a card.  You can read all about it and view the sketch by clicking here .  I decided that I wanted to make a few more of these cards with fall themes and paper.  In so doing, you should be able to see the versatility of using sketches. Supplies: PaperTrey Ink - Counting My Blessings and Boutique Borders Sympathy dye and stamp sets The Paper Studio Cyprus collection Ink - Memento Tuxedo Black & Wild Hone Distress Ink DCWV - Autumn Melody and Neutrals 2 matstackes "Nutty" Fiskars border punch  I go into a bit more detail on the video. Thanks so much for stopping by today.  Remember to take some time to enjoy the little things.

"Strengthen" 4X4 Card Share

Image
Everybody needs a little note of encouragement sometimes.  I wanted to express my appreciation for a few people so I decided to make some little encouragement cards for them.  Originally, I planned to make 3X3" cards but when I found this stamp set, I knew it was the perfect sentiment but a bit too big for 3" cards.  That's when I decided to make 4" cards instead.  I don't plan to put them in envelopes, but may put them in clear bags as they will not be mailed. These super simple cards only required a few paper layers and went together really quickly.  Despite the fact that the brown card is difficult to see in the picture, I think it is my favorite!  I like the richness of the colors. Supplies: Graphic 45 - French Collection in 8X8 DCWV - Autumn Melody matstack The Paper Studio - Cyprus collection Memento Tuxedo black ink Ribbon - Really Reasonable Ribbon Stampabilities - Some People stamp set Prima Flowers Memento Tuxedo Black ink...

Tea Time Bag Toppers

Image
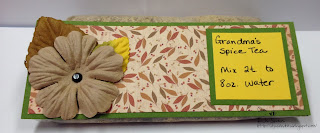
Fall is in the air.  I love Fall.  This year I feel like I am nesting a bit.  Things are getting organized and cleaned up and we are settling in for the winter.  Part of that is making spiced tea and hot chocolate.  I will plan to share the recipe for the hot chocolate in a future post.  Recently, I posted the recipe for the spiced tea that we loved to drink at Grandma's house.  She made it every year and we loved to sip it with her.  You can see her recipe here . After chatting online with my sisters (I have 6), I decided to make a double batch and send it to them, to my mom, and to my sister's- in-law.  We may not be able to sit down and enjoy tea together, but we can still have tea time. Of course tea at tea time should be served in a pretty cup.  In my case, I decided I needed a pretty bag.  Here's what I made. Supplies: Sandwich sized zip top bags with tea The Paper Studio - Cyprus paper pack DCWV - The Autumn ...

Altered Scrapbook Sketch Card

Image
Today I have something to share with you that I've never tried before.  I took a scrapbook sketch and turned into a standard A2 card sketch.  I love the way it turned out and hope you will too. I started by choosing a sketch that was originally posted on Srapbook Challenges.  If you click on the sketch, you will be taken to the original sketch.  They have lots of fun sketches for all you scrapbookers. I then created my own sketch to make it fit on a standard 4.25" X 5.5" card.  Each of the banner ribbons were cut  at 3/8" wide. Now it was time to create the card.  I needed the following supplies to pull it off: DCWV - The Tradewinds Matstack Core'dinations "Timeless" Textured Cardstock (grey) Georgia Pacific white cardstock Stampendous "Happy Messages" stamps Close To My Heart - Outdoor Denim ink Fiskars "Upper Crest" border punch EK Success 1 3/8" circle punch Martha Stewart Butterfly punc...

Teddy Bear Baby

Image
Good morning everyone.  If you are hopping over from 3 Girl JAM, welcome.  I have a little card for a co-worker to share with you today.  I wanted to make her something unique but also pretty.  3 Girl JAM had the perfect combination of ribbons, though I used pieces from 2 different bundles.  Iris from the Spring Flowers bundle and Baby Girl from the Baby bundle paired beautifully to pull this card together. Now I realize that the picture looks a bit fuzzy and I was bummed about that at first.  Then I realized that the vellum overlay was causing that look.  It makes the card feel soft and ready for baby. Besides the gorgeous 3 Girl JAM ribbon that is linked in the bundles above, I used a few other products.  They are: Prisma colored pencils - Sienna brown, dark umber, burnt ocre, black, pink, violet, parma violet, peach Gamsol Charm from a RAK Teddy Bear Vellum Cardstock - white from Paper Trey Ink and Georgia Pacific Colore...

Special Day

Image
Today I am celebrating something special.  I am celebrating the first time that I became a big sister.  Not that I remember that day.  I was only 18 months old when this little guy was brought home.  My original plan was to call or text him today, but I decided to do a post all about my amazing brother instead.  Don't worry, I won't forget the text. Though he's all grown up, he will always be Tommy to me.  I've tried and tried to call him Tom but it just doesn't work.  We've played together, worked hard together and even cried together.  Truth to tell, we've gotten in trouble together a few times too.  It was ALWAYS his fault though (snicker, snicker). Tommy has given more than any of us can imagine to those he loves.  He has shared his home with children who are hurting.  He has opened his life to people from all around the world.  This quiet man has been a pillar of strength which many have leaned upon. So today litt...

Arriving at Disneyland - What's Next?

Image
After all your planning, you have finally made it.  There is so much to see and do and it can be overwhelming.  As I was preparing for the trip and discussing it with a co-worker he told me how much his family loves to go.  He also gave me a very good piece of advice: "Take in the whole experience.  If you just go from ride to ride, you will end up disappointed that you spent all that money on amusement park rides.  Take time to see the shows." He was a wealth of information and I listened very carefully.  I'm so glad that I did!  Enjoying the little things made the trip even better.  One thing that I failed to mention in my last post is that good shoes are a must.  Even my flip-flop wearing daughter opted for sensible shoes for the daily treks through the park! When you arrive at the parks, your bags will be searched.  I will say that this is a pretty smooth and quick process.  You are just steps away from your final destina...