Twisted Easel Cowboy Boot Card
Mary from CardzTV made a fabulous Twisted Easel card. In fact, I liked her's so much, I went to Joann's and bought a pad of black and white paper so I could make one. For information on how to make a Twisted Easel card, check out this Link: Twisted Easel Card. Thanks so much for sharing Mary!
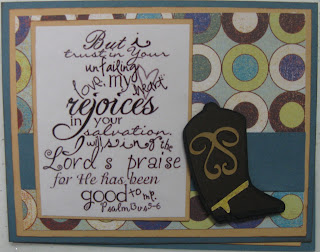
This birthday card was made using the same technique found in Mary's Video. However, I wanted to use a western theme. Here's what you will need:
Supplies:
Cardstock - yellow, black, tan, dark brown, country blue, white, printed (from my stash)
Ps. 13:5-6 from Dee's Bugaboo Boutique
Adhesive (my favorite is ATG)
Dimensional adhesive
Stickles - clear
Color Box Chalk ink pad - Chestnut Roan
Tools:
Cricut Machine
Cricut Cartridge - Just Because Cards
Computer
Fiskars edge punch
Martha Stewart scoreboard and bone folder
Using country blue cardstock, cut and assemble the twisted easel card in Mary's video (Though I will attempt to explain the steps, you might find the video helpful here). Cut one piece at 4 1/4" X 9 3/4". This will be the base of your card. Cut a second piece for the front at 4 1/4" X 5 1/2". Using the scoreboard, score the base of the card at 5 1/2". Turn card diagonally and align the point and the inner corner of the previously scored line and make a score mark. This turns the 5 1/2 inch box into 2 triangles [It is not as difficult as it seems. This is why the video may be helpful ;)] Fold the card in half and then fold the diagonal line down to the fold. Adhere the smaller piece of blue cardstock to the base by lining the top edge with the point.
Using "Just Because Cards", cut the boot at 2" (page 65 with all the layers) using black, brown, yellow and tan cardstock. Assemble and apply clear stickles to the spurs. Cut the other pieces for the card as follows:
2 tan mats at 4" X 5 1/4 "(Using the Fiskars edge punch, punch one 4" edge on one of the mats)
Printed mat at 3 3/4" X 5"
Tan mat for front (Scripture) sentiment at 2 3/4" X 3 1/2"
Country blue strip 1" X 5" and another one 2 3/8" X 1 3/8". Using the Chestnut Roan chalk ink, ink the edges of all the tan mats as well as the smaller blue mat. Using your computer, print the Scripture sentiment on white to fit inside the tan mat. Print the inside sentiment on white to fit inside of the smaller blue mat (I used Andalus at 20 PT from Microsoft Word.
Begin Assembly:
Assemble one tan mat to the front of the card. Add the printed mat, followed by the blue strip. Adhere the matted Scripture sentiment to the blue strip. Use pop dots or dimensionals to lean the boot against the edge of the scripture sentiment.

Assemble the inside of the card by adhering the tan mat you prepared with the decorative edge to the base of the inside of the card. Adhere your inner sentiment to the blue mat. Using dimensional adhesive, apply the matted sentiment at the angle needed to prop the front of the card up like an easel.
Of all the cards I've made through the years, I think this is my favorite. I really hope you try to make your own version.


Comments