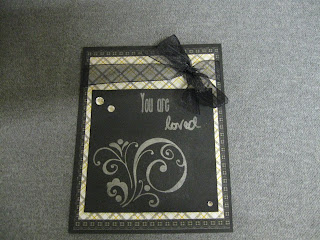
You Are Loved Card
Tools -
Stamps - "Amazing You" set from K. Andrew Designs
Stamps - "Monarch" set from Inque Boutique
ATG Adhesive
Paper Trimmer and bone folder
DCWV - Lemon Flower Matstack (I chose a yellow/silver background and a black background)
Black card stock
Pale yellow card stock (scrap from my stash)
Ranger Perfect Medium
Ranger Perfect Pearls in "Perfect Pearl"
Black organdy ribbon (from my stash)
Creative Charms gradient jewels - 3 different sizes
Outside of the card:
Cut a piece of black card stock to measure 11" X 4 1/4". Fold at 5 1/2". This will be the base of your card. Cut a another piece of black card stock to be 3 1/2" X 3 1/2". Cut a black print mat at 5 1/4" X 4". Cut the yellow print mat at 5" X 3 3/4".
Stamp your image (I used a flourish from the "Monarch" set and "You are loved" from K. Andrew's "Amazing You" set) with the perfect medium. I started with the flourish. Using the fine brush that comes with the Perfect Pearls, apply "Perfect Pearl" color over the top to the stamped image. Remove excess and repeat with the sentiment. Spritz over the top of the design lightly with water to set the Perfect Pearls. Allow to dry.
Adhere the mats to each other. Adhere the stamped mat to the other mats. Tie a bow and adhere the ends on the back of the mats. Adhere to the card base. Add 2 jewels to the card in the upper left corner and 1 to the lower right corner. Unfortunately, the camera does not pick up the pale yellow and silver in the lighter mat, but it is actually quite beautiful.
Cut pale yellow scrap to 4 3/4" X 3 1/2"
Cut a piece of the black patterned paper used on the front of the card to measure 1/2" X 3 1/2"
Cut a piece of the yellow patterned paper used on the front of the card to measure 3/4" X 3 1/2"
Adhere larger yellow piece to the inside of the card. Adhere the black patterned paper to the yellow patterned paper. Adhere both pieces to the bottom edge of the yellow mat.
This card was quite simple (I think it took longer to post it to the blog than it did to make the card). Thanks so much for stopping by to check out this card. Have a great day.


Comments
Amy :) at www.lovetocrop.com