Posts

Showing posts from October, 2011

Black & Orange Thank You Card

Image
The card I made today was designed to be able to be used at the Getting Cricky Super Simple Sunday Challenge at GettingCricky.com .  If you have spent much time on my blog in the last few months, you know how much I like the stamps designed by Kristal at Getting Cricky.  She just released several new stamp sets and you should really check them out.  You can do so by clicking on the store at K. Andrew Designs - here .  A portion of the proceeds of each stamp set is donated to charity. The rules for this challenge were simple: Create a project using orange and black.  You are allowed to enter as many times as you wish (this is my second entry), and you were also allowed to use one additional color of your choice.  I chose to only use orange and black.  Here's what I came up with: Supplies: Black cardstock - cut at 11" X 4 1/4" 2 pieces of orange cardstock - cut at 5 1/2" X 4 1/4" Versamark ink pad Perfect Medium ink pad Perfect Pearls - "Per...

New Blog Features

Image
I trust everyone is having a great day.  I went back to work the other night and it went pretty well.  I was grateful for a great crew and a fairly easy shift (I can even say "slow" since its in the past, right?)  I just wanted to let you know about a couple of features that have been added to the blog.  First of all, I now have a blinkie.  Feel free to add it to your blogs.  It is from the TheShabbyVanity.com.  Madeline did a great job.  I would highly recommend her.  I told her about what I liked and gave her my blog address.  She then designed it and sent it to me for proofing.  I loved it.  I only asked her to add one word (sharing) to the original and voila - a blinkie was made. The second feature is that I have added a "subscribe by email" feature.  I use this feature on some of the blogs that I subscribe to and am always glad to be emailed when they post new projects. <center><a href="http://www.djss...

Orange & Black "Great Day" Card

Image
This card was created for the Super Sunday Challenge at GettingCricky.com.  The rules were that you had to use orange and black and you could include one other color.  I chose to keep it to the 2 colors only.  This was a fun card that I created "on the fly".  Watch the video below to find out how I created the background for the front of the card. The sentiment on the inside of the card was stamped using "Coffee & Tea for You & Me" by K. Andrew Designs.  Find out how I achieved the shimmery effect on the sentiment by watching the video. Thanks for stopping by today.  I think I may just do some other cards with these techniques.  Hmm...

Christmas Tree Card

Image
I really had not intended to start Christmas cards yet.  However, I purchased this cartridge for my mother-in-law who is a new Cricut owner.  I wanted to make sure I understood how to use it so that I could answer any questions that arise.  This video is more than just a card tutorial.  It is also a walk-through of the Scandinavian Christmas Card Cricut cartridge.   The card base was cut at 5", forming a card that was 5" tall X 4.25" wide.  The tree (Tree #2) and its layers were cut at 3".  Peapod "green" twine from the Twinery provided a simple finishing touch.  I hope you enjoy the card and the walk-through.  Thanks for watching.

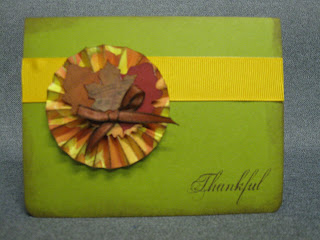
Rosette Thank You Card - Are You Thankful?

Image
I have so much to be thankful for.  I have a God who saved me only by His grace with nothing I can do on my own.  I have the most amazing husband in the world and a great family.  I have a host of caring friends and family who have prayed for me and cared for me over the last couple of weeks.  These cards were designed for them. At least one of the lists of sins recorded in the Bible includes the sin of not being thankful (See 2 Timothy 3:1-6). WOW!  That should remind us about how important it is to be thankful.  I don't think we ever really consider not being thankful as a sin.  What are you thankful for today?  Lets see how many "thankful" comments we can post below. When I think of fall, I think of the traditional golds, oranges, and browns, with maybe an accent of green.  This time I switched that up and used the traditional colors as the accents.  I love the way this turned out.  I used the K. Andrew Designs "Fall-O-...

Tags 2

Image
In this video, I show 2 tags that were made using different techniques.  Distress Ink is used on both tags as well as stamps from K. Andrew designs.  On one of the tags, homemade glitter mist is added to a Prima flower to add a beautiful shimmer to the finished tag.  Thanks for watching and check back soon for more projects.

Super Supplies Saturday - Episode #9 (Glitter Mists)

Image
Today we discuss glittery mists, how to make them, and how to use them.  This is a fun product and can be a great asset to your projects.  Thanks for watching.  I hope this inspires you to go out and try this project (or even to try making your own).

Fall Treat Can

Image
Tonight I wanted to make a little treat box for my favorite person.  I purchased this paint can at a craft store and then altered it using K. Andrew Designs "Fall-o-Ween" and "Amazing You" stamp sets.  If you have never seen these stamps, visit the blog, Getting Cricky and look at the great stamp sets.  A portion of the proceeds is donated to charity and they are super stamps! Lets get started on the project. Supplies : Paint can Striped paper  (from my stash) Scraps of paper in different colors and patterns Cream colored cardstock for sentiment (scrap from my stash) Gold Colored cardstock for lid cover (scrap from my stash) Distress Ink (I used the seasonal set - ripe persimmon, seedless preserves, gathered twigs) Adhesive Ribbon (from my local Walmart) Twine (Cappuccino from The Twinery) Treat to fill container Tools: Cricut cartridge - Designer's Calendar Ranger craft mat 5/8" Circle punch Corner rounder, paper trimmer, scissors S...

Cricut Imagine & Twine Tips; New K. Andrew Designs stamps

Image
In this video,  I show you some tips I learned this week on YouTube.  I also show my new set of stamps - "Coffee and Tea for You & Me" from K. Andrew Designs.  I am posting links to all the sites mentioned in the post below the video post.  Thanks for watching. My Pink Stamper liveloveandSCRAP The Twinery K. Andrew Designs - Stamps Cricut Rewards Cricut

And the Winner Is...

Image
And the winner is.... Sue D Please send me a message with your address and I will get this fun packet sent out to you soon.  Thanks to everyone who subscribed and commented.  It was fun.  Please tell your friends about this blog.  I have some fun projects planned.  Have a great day everyone.

Rosette Baby Card

Image
The theme for this month's card exchange club was "baby".  I didn't realize that I only had a couple of baby stamps.  I don't have a specific Cricut baby cartridge though there are some that would work on other cartridges.  I decided to make this card using the Tim Holtz Alteration "Paper Rosette" dye.  I also used a punch from EK Success and a Stampin' Up stamp on the inside of the card.  Thanks for watching.

Terrific Tools Tuesday - Episode 7 (Scissors and Paper Trimmers)

Image
Today we discuss two more basic tools used by paper crafters.  Come along and see the tools I use and why I use them.  Thanks for watching.

It's the Little Things

I have the most amazing husband in the whole world!  The other day I had spent a lot of time looking at blogs and decided I needed a favicon.  Now there are people out there that make them for a price and that is an option.  However, my husband took the project on and now I have a new favicon.  I have noticed that it doesn't always work in Firefox, but seems to work better in other browsers.  Now you should be able to see my little purple and white DJ on your tabs.  Sure its a little thing, but its also another reminder of how amazing this man that I married really is!

Seasonal Distress Inks Are Here! (and don't forget the giveaway going on)

Image
I am so excited about the package that arrived in today's mail. My seasonal distress pads came today. Woot Woot! The day they were announced I tried to find who would have them. Unfortunately, I couldn't find them anywhere. I finally found them but everywhere I found them had sold out. Finally, I found that I could pre-order the second run at MelissaSamuels.net. They finally arrived today.  I can't wait to use them on all the Thank You notes I need to make after my surgery. Also in the package was the set of stamps from the "Lost & Found Two - Blush Princess" set that I had ordered for the sewing journal.  Since the ink pads were on hold for so long, the stamp set was delayed as well.  That's OK because I have another project I can use them on.  I really recommend these stamps as they are quite inexpensive.  I think they run about $5.99 a set and have really cute images.  They will work great with the K. Andrew Designs stamps I have.  Be...

Crazy Week... And don't forget the blog candy in Thursday's Guest Designer Post

Image
This week has not gone exactly as I had planned. Before heading to work on Monday, I had a quick visit with one of the fabulous surgeons at MWMC to discuss the results of a recent ultrasound. It appeared that I had a gallstone that was about an inch long. Now I've suspected my gallbladder was acting up for several years, but it just wasn't getting worse (as least in how I felt). The MD told me she could take it out on Tuesday. I didn't think I could find coverage for a shift that soon, but God had my co-worker, Amy ready and available to take it so surgery was scheduled. Recovery is in full swing and I have 2 weeks off. I'm not even supposed to vacuum - lol. My brother-in-law sent me this plant and my son gave me the little bird. They make me smile. I'm so thankful for all the help my wonderful family has been during this time. Our church family has been so great to help with meals and I have become very good friends with Canada Dry Ginger Ale. I'm...

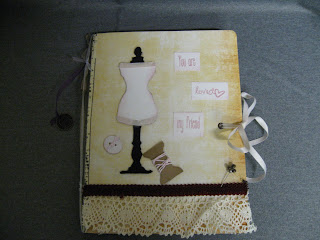
A Sewing Journal - Getting Cricky Featured Blogger Thursday

Image
I am so excited that Kristal from "Getting Cricky with K. Andrew" asked me to be a featured blogger.  Thanks so much for the opportunity.  I decided to make a video as it is far easier for this project.  I ended up splitting it into 2 videos due to the length.  Please don't be intimidated.  In these 2 videos, I take you through the entire process of making a journal - from start to finish.  It is a fun and rewarding project. Part 1 Part 2 Now for some blog candy.  To qualify, become a follower of my blog: www.djssundries.blogspot.com .  Then leave a comment stating how you would use a journal. The winner will receive a blank composition book, a piece of sticky back canvas, a set of tags from K & Company, and journal spots from Basic Grey.  You will also receive ribbons, lace, and trims matching the ones in the featured journal, a stick pen, Tim Holtz muse charm, and 2 eyelets, and a set of the die cuts used in the jour...

K. Andrew Designs - Design Team Call

Good morning everyone.  I just wanted to let you know that K. Andrew Designs is having a Design Team call.  You can find the rules by clicking here.   Kristal designs great stamps and part of the cost for every stamp set is donated to charity.  Each set lists the charity it goes to, so you can even see where your hard earned money is being donated (before you buy).  You can see all Kristal's stamps here. Not sure what to make with the stamps?  I have linked every project I have made using her stamps on the side bar to the right of the page.  Just scroll down to "K. Andrew" and I have the projects listed by stamp set. Be checking back later this week.  On Thursday, there will be a BIG  project that I used the "Scripture Sayings" and "Amazing You" sets on.  I am super excited about this post (but more on why later).  There will also be a giveaway with that post, so check back on Thursday to see how to enter the giveaway drawing....

Military Appreciation Gift Card

Image
I made these cards to have on hand for military personnel.  I am so thankful for those who serve our country to help keep us safe and free.  The outer sentiment states : "Serving proudly, standing tall.  Thanks for serving and answering the call."  The inner sentiment states: "Today American Soldier I prayed for you."  I used the Cricut "Stand and Salute" cartridge and K. Andrew Designs' "Freedom Isn't Free" stamp set.  This was a super simple card and I hope I can make many more.

Super Supplies Saturday - Episode #8 (Sticky Backed Canvas)

Image
This week we discuss a product that is new to me.  I can tell you that I will be using it on future projects.  It is fun and easy to use.  I will be posting a special project on Thursday where I use the dress form similar to the one seen in this video.  There will also be a fun giveaway on that post.  Thanks for watching and have a great weekend!

Terrific Tools Tuesday - Episode 6 (Rulers)

Image
I know that rulers seem like simple tools.  However, paper crafters need rulers while creating their projects.  Hopefully, you will see how "TERRIFIC" (and simple) these tools truly are.  Thanks for watching and have a great day.

Ribbon Book & Storage

Image
In this video, I will show you how I made a couple of ribbon books.  This project was not that difficult.  I hope you give it a try.  Thanks for watching.  Hope to see you back soon. To see the book that inspired me to make this one, go to http://www.youtube.com/watch?v=v2rDfEJBcKE

Fall Thank You Card

Image
I had planned this post to go on the blog on October 2.  That was before I realized that today is World Cardmaking Day .  I just couldn't let that slip by without posting a card.  Right?  This project was so much fun using fall colors.  Thanks for watching!

Super Supplies Saturday - Episode #7 (Tags)

Image
This week I talk about tags.  I am also providing the link to the video Tutorial on some tags that I made.  Hope you enjoy these and thanks for stopping by. Tag Video Flower Tag Video Goosebumps/ Old Jalopy Tag

SM's Crafty Creations Link Up Party - Fall Gift Card

Image
Here is a submission I made for the Link Up Party at ScrappinMamma.  Deborah said: This is a super simple card that I made using a leftover dye cut.  I made it as a card of encouragement and used a scrap piece of yellow textured card stock from my scrap stash.  Let's get started. Supplies: Yellow card stock - 8" X 4" Designer paper - K & CO, dictionary paper (scrap from my stash) Color box terra ink -Terra Cotta Distress Ink - "Tea Dye" and "Walnut Stain" Ribbon - 1/4" wide brown ribbon by 8-8 1/4 " Gift Card Tools: Tim Holtz ink applicator "Designer Calendar" Cricut cartridge Stamp - "Scripture Sayings" from K. Andrew Designs ATG Instructions: Using the "Designer Calendar" Cricut Cartridge, cut a maple leaf at 2 1/2" from the dictionary paper (or any other paper with words on the background.  You could even stamp your own paper to achieve the same effect).  Ink around the edges o...