Posts

Showing posts from July, 2013

Summertime Mini Canvas
Image
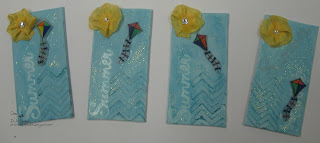
Today's project is full of little things to enjoy - a canvas, kite, chevron, and sun.  I get so busy with life that I forget to enjoy these little things.  How about you?  When was the last time that you reveled in the feel of the sun on your face or watched a kite float through the sky?  If you're like me, it's been too long.  This tiny project was a lot of fun to make, despite being a bit challenging.  I recently participated in a Mini Canvas swap at Art & Sassy .  Though the concept was clear in my head, I had a difficult time translating that to canvas.  It all worked out and I must say that this Sunflower crinkle ribbon from 3 Girl JAM truly finished it off.  It just didn't look right until I made the little sun. Here's what I used to make my mini canvas: 3 Girl JAM - Sunflower crinkle ribbon 2"X4" Artist Loft canvas Artist Loft  modeling paste Gesso October Afternoon "Kite Tails" stamp set Shrinky Dink Kites...

Revisiting Old Cricut Cartridges - Enjoy the Summer

Image
I needed to pull out my Imagine and make some cuts to make sure that it was working correctly after a recent electrical problem at my house.  I thought this was the perfect time to feature an Imagine cartridge as we are featuring older cartridges right now.  I pulled out my "Best Friends" cartridge (which I don't believe had ever been used) and make a cute card. Supplies Used: Cricut Imagine "Best Friends" cartridge Miscellaneous white cardstock from my stash Crystal Stickles K. Andrew Designs "Splashtastic Summer" stamp set Memento "Tuxedo Black" ink The Paper Studio - white cardstock from the Holiday pack Blue "rhinestone" bling from Michaels Scotch foam tape and ATG Can you believe that the image as well as the color and patterned papers all come from the same cartridge?  Be sure to watch the video for full instructions. Thanks so much for stopping by.  Remember to takw some time to enjoy the little thing...

Trees to Treasure Inc. - Wood Veneers

Image
I found a fun new place to shop.  It's called Trees to Treasure Inc.  I really like these wood veneers and I hope to make some fun projects in the near future.  You can check out their photobucket site by clicking here .  Thanks for stopping by today.  Remember to take some time to enjoy the little things today.

Crafty Fun with Aunt Cheri - Shrinky Dinks

Image
Late once again... Sometimes that's just how my life runs.  Today, the plan was to make Shrinky Dink necklaces.  This did not come without some complications.  The first was the type of shrink material that I initially chose was clear and did not take the stamp well, even though I sanded it down first.  I then purchased some actual "Shrinky Dink" frosted material.  It turned out so much better.  I am really surprised how well the frosted material took the Prisma colored pencils.  Unfortunately, the pictures did not turn out well.  Be sure to watch the video to see the finished charms.  I will admit that I liked them so well that I decided to do a future project using them.  Keep an eye out. Thanks so much for stopping by today.  Remember to take some time to enjoy the little things.

Do little things really matter?

Going to camp is a highlight of my kid's summers.  This is the first summer in the past several that my daughter hasn't spent several weeks on staff and one as a camper.  My son loves camp too.  They haven't missed a year since the 4th or 5th grade.  This morning they were off to camp again, my son as a camper and my daughter as a counselor. As my son was getting the check for his camp fee, I let him know that I included a little extra for him to make sure he would have plenty to get him home.  He casually mentioned that's what Grandma did too.  I didn't have a clue what he was talking about until he reminded me that Grandma always gave him a little extra to take with him to camp.  It was a little thing, but it was something he remembered about his grandma and it almost brought tears to my eyes. This reminds of something that Jesus said in Matthew 25:40.  He said, "Assuredly, I say to you, inasmuch as you did to one of the least of these My br...

OWH Sketch #182 Challenge Cards

Image
As soon as I saw the current sketch at Operation Write Home, I knew that I had to use it to make some cards.  I needed to make a sympathy card as well as a thank you card.  However, by the time I stopped for the night, I had made 9 different cards with variations of this sketch.  Actually, the paper used for 2 of the cards didn't fit the sketch, so we will just call them bonus cards.  With the exception of the card bases, all the cards were made using scraps. Some sketches are just perfect for scraps.  Now on to the cards: Supplies: K&Company "ancestry.com" paper pack Paper Trey Ink - Vintage Cream Cardstock Memento Tuxedo Black ink K. Andrew Designs - Sympathetic Sayings stamp set Supplies: Scraps from my stash Paper Trey Ink - Vintage Cream Cardstock Barn Red - Distress Ink marker Stampendous - "Happy Messages" stamp set MME - Lime Twist twine - red/ white Archival "Coffee" ink Supplies: Paper Trey Ink - White card...

Vintage Altered Cigar Styled Box

Image
Vintage styled altered crafts are so incredibly fun to make that I had to share one with you.  I am participating in an altered cigar style box swap.  I must admit that I had so much fun with this one that I plan to make more in the future. I had some paper from the ancestry.com line by K&Company that was perfect for a vintage style box.  There are a few 3 Girl JAM ribbons that coordinate perfectly with these papers.  I decided to use Coral Crush from the Caribbean Splash bundle and Cream from the Coffee bundle to accent these great papers. Of course there were a LOT of other supplies that I needed: 8X8 wooden box Paint - Napa Red paint and Weathered Wood crackle medium by American and Warm White from Folk Art J.W.'s Right Step clear varnish Adhesives - Gorilla glue, hot glue, Glossy Accents Spools from Laura's Crafts K and Company metal art embellishements Recollections leaves, clear plastic paper, wooded butterfly Lace (from my stash) Tiny ...

Vintage Card - Shaped Card with Ribbon Challenge

Image
Good morning everyone.   If you hopped over from the 3 Girl JAM challenge blog, welcome.   If you are just stopping by my blog today, you should check out the great challenge going on right now.      I had fun making a shaped card and I hope you have fun too.   Be sure to link up your shaped card before time runs out.   There’s a great prize that’s up for grabs. For today’s card, I pulled the Cricut Art Philosophy cartridge and modified the postage stamp card and another shape in the Cricut Craft Room.   Scrumptious 3 Girl JAM Coral and Cream crinkle ribbon provided the perfect combination to finish up the card. Supplies used: 3 Girl JAM – Coral Crush ribbon from the Caribbean Splash bundle and Cream from the Coffee bundle K & Company paper – co-branded by ancestory.com Buttons and lace from my stash Cricut Art Philosophy cartridge (Pages 24 and 35 modified in the Cricut Craft Room) Pearls from Want2Scrap Vintage Photo a...

Crafty Fun Watercoloring

Image
Good Morning!  I trust you are having a great day.  Today's Crafty Fun with Aunt Cheri was from an idea I found on Pinterest.  You can see the original post by clicking here . Of course, there was some modifying from the original pin because I am doing this with my little (and not-so-little) people. I started by cutting some 9X12 Canson watercolor paper to run through my printer.  I then found these cute images online.  You can find them by clicking here and here . Other items used: Crayola watercolors White textured card stock from The Paper Studio Designer paper from the 6X12 pad "Tags. Bags, Boxes, and More" by Provo Craft Yellow ribbon from Really Reasonable Ribbon After the video was over, I decided to use some of my favorite toys to make this a bit more grown up.  Even though the image is super simple, it made a charming little card.  I pulled the second image that I made for the little people and the following items: Distress...

Revisiting Old Cricut Cartridges - Happy 18th Birthday Tag

Image
Everyone can use a tag, right?  I know that I can.  I have tags stuffed in a drawer, ready to be made into beautiful little pieces of art.  But did you know that there are lots of tags on Cricut cartridges?  In fact, if you go to MyCutSearch.com , there are 119 pages to go through to find the tag you want.  It's not just the new ones either.  Some of the cartridges have been around awhile.  I chose the Preserves cartridge for today's tag. Supplies: Watercolor Paper Cricut Preserves Cartridge - pg 47 cut at 5.5 inches Distress Inks- Broken China, Faded Jeans and Peeled Paint Perfect Pearls water mist (homemade) Close To My Heart - dimensional elements and Birthday stamps from the Artiste bundle Studio G glitter glue Echo Park "Splash - Bella Road" letter and number stickers Really Reasonable Ribbon - Blue, Green, White stripe Hero Arts Stamp and Cut - "Balloons" Thanks so much for stopping by today.  Remember to take some time to...

Crafty Fun Door Hangers

Image
I am so sorry that it has taken me so long to get this video up.  I have been sick and not feeling up to making videos or even doing much crafting.  Today's project was pretty simple and it was fun too. I used: Pre-made door hangers Pre-made foam stickers (Both are available at Dollar stores, craft stores, Walmart, etc) Studio G glitter glue in clear Red Stickles Here is a list of the Bible verses that we have been memorizing: 1. Proverbs 20:11 2. John 3:16 3. Romans 3:23 I really hope you are learning them.  ***Moms - If you think that one of the verses is too long, you are welcome to help your child learn a shorter part.***  Be sure to email me at djssundries@gmail.com if your child has said their verses so that I can keep track. Thanks for stopping by today.  Remember to take some time to enjoy the little things.

Announcement and a Haul

Image
Hello everyone.  I'm a bit out of commission right now.  However, I wanted to post this video that I made before I got sick.  It contains an announcement as well as a tiny haul. Have you heard about Blitsy?  I have purchased a few thing and am impressed with some of their prices.  If you would like to join in the fun, click here .  If you decide to order and get something, this link will give me a credit too. Thanks for stopping by today.  Remember to take some time to enjoy the little things.

Revisiting Old Cricut Cartridges - Bee Happy Card

Image
Do you have Cricut cartridges sitting on the shelf that you haven't used in a long time?  I definitely do and that is very sad.  All of those cartridges up there should do something more than just collect dust.  I decided to set a goal and make at least one project per week with a cartridge that I haven't used in a long time.  I  Today I chose <insert drumroll>: Just Because Cards I believe that this is one of the earliest cartridges I purchased as a brand new Cricut user.  It is a good one for a new Cricut user because it has complete cards that you can basically just choose your papers and then just follow the layout in the book.  Easy peasy.  Unfortunately, I don't believe that it is still available. I used the following: Just Because Cards - button #33 White card stock - Georgia Pacific DCWV - Neutrals and Lemon Flower matstacks Lawn Fawn - "On the Mend" Memento - Tuxedo Black ink pad Vellum (unknown source)  Tha...

Speedy Recovery Card

Image
I have a friend who recently had carpal tunnel surgery.  This wonderful little set of stamps from Lawn Fawn is perfect for get well cards.  I knew that I could make her a quick little card.  I started with the following supplies: White cardstock - Georgia Pacific and Paper Trey Inc "One Fine Day" 6X6 paper pad from Three Bugs in a Rug Lawn Fawn - "On the Mend" stamp set Fiskars "Scalloped Sentiment" and 2" round punches Ranger Archival ink - Jet Black Memento ink - Tuxedo Black Spellbinders - Big Scalloped Circle die set Prisma colored pencils Pearls from Michaels Thanks for stopping by today.  Remember to take some time to enjoy the little things.

4th of July Treat Baskets

Image
Because the ER never closes, I am scheduled to work today.  I took some treats along to my co-workers.  To start out, I made a treat basket using Tags, Bags, Boxes & More 2.  This first video gives some tips using this fun cartridge.  I used textured card stock from The Paper Studio to cut the basket. I decided to then decorate the basket using the Flower Shoppe Cricut cartridge.  I used scraps of red, white, and blue paper from my stash.  I also used some paper from K&Company's Americana 4X6 pad.  The basket was completed with shear white ribbon from my stash.  The centers of the flowers were finished off with bling from Meghan Elizabeth and a pearl from Michael's. Of course, a treat basket needs to be filled with treats so I picked up some clear bags from Wilton and filled them with red, white, and blue M&M's.  I closed each bag with some blue ribbon from Ofray.  Leftover chipboard stars and heart that were cut us...

Stickpins & Pinwheels

Image
Happy 4th of July.  I am so thankful to live in this great country.  I trust that everyone will have a great and safe time celebrating our country's birthday.  I think that crafting for the 4th of July is so much fun and I wanted to share this little craft with you today. I enjoy participating in swaps.  One of my favorite items to swap is stick pins because they are so pretty.  I recently participated in a red, white, and blue stick pin swap.  The stick pins have to be in a holder of some kind.  As I was playing on Pinterest recently, I ran across these pinwheel hair clips .  I decided that they would make a perfect holder for this month's stick pins once I modified them to fit my needs.  That's right - 2 fun gifts in 1. You will need: 3Girl JAM Red, White, and Blue bundle found here red, white and blue felt - cut into 4" squares Buttons Adhesive or thread to make pinwheels (I used E600 and thread) Hair clips or barrettes Sti...

Crafty Fun 4th of July Pins and Magnets

Image
Welcome to week 2 of Crafty Time with Aunt Cheri.  I hope that everyone had a great time doing their project last week.  I also hope that you have said your memory verse - Proverbs 20:11. This week's memory verse is from John 3:16.  It talks about how much God loves us.  You really should go and look it up.  Now on to the project: You will need: Chipboard stars and/or hearts Red, white, and blue tissue paper  White glue Pin backs or magnet Paint (optional) Heart and star cookie cutters (or a die cutting system) This was not an original idea with me.  I received my ideas while looking on Pinterest.  You can find the original posts here and here . Thanks so much for stopping by today.  Remember to take some to enjoy the little things.

Happy July 4th Card

Image
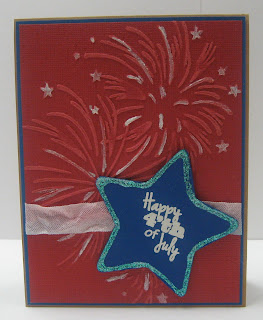
Typically, I don't spend much crafty time on projects for the 4th of July.  That is really a shame because there are so many fun things you can do to decorate and to celebrate.  I decided that this year I would do a mini series of blog posts and videos that celebrate Independence Day.  There will be 4 days worth of posts that will showcase a variety of items. Kicking off day one will be this fun card for the 4th.  I typically don't send cards on July 4th.  I told my husband that I think that this was the first project that I have ever posted that wasn't intended for someone or something in particular.  I actually decided to give it to a sweet toddler in our church.  There were some other little goodies that I gave with it, including an altered mini composition book that took less than 5 minutes to make (and I didn't get a picture). I used the following products: Red, white, and blue crinkle ribbon from 3 Girl JAM Core'dinations - Tim Holt...