Posts

Showing posts from May, 2013

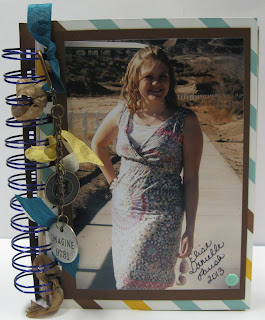
Graduation Autograph Frame

Image
Today is my daughter's BIG DAY and I want to show you the autograph frame that I decorated for her graduation table.  It was a pretty simple project and I really like the way it turned out.  It will really be special when it is filled with autographs.  Most importantly, my daughter likes it.  Another bonus is that it is a perfect match to the autograph book that I posted last week.  You can see that post by clicking here . I used the following supplies: Prima - Leeza Gibbons "Wishes and Dreams" paper Coredinations Teal paper Cricut and the Cricut Craft Room Stampendous Graduation Cap stamp Archival - Coffee ink Ofray teal ribbon Autograph frame from JoAnn's Xyron 2.5" sticker maker Scotch quick dry adhesive Now for the video: Like I said, this was a very quick project and I plan to have it on her graduation table. I plan to link this to the following challenges: Decorate to Celebrate - Graduation Simon Says Stamp - Anything Goes challenge

Feminine Graduation Cards

Image
Recently I saw a great tutorial by one of my 3 Girl JAM design team sisters on making lace and ribbon flowers.  While watching Scrappin' Abby's tutorial (found here ), I finally realized what I needed to do to create flowers.  I decided to try her technique and the first flower I made is one that you will see on today's card. I used these items - 3 Girl JAM - Spring flowers bundle: Iris found here Striped purple paper and other purple papers - scrap stash Seedless Preserves Distress ink Really Reasonable Ribbon - Lace Spellbinders - Large Scalloped Octagons Stampendous - Graduation Cap stamp Georgia Pacific white cardstock 2" paper punch Xyron 2.5 sticker maker Buttons Digital image from Rosebud's Craft Store Now these cards have quite a bit of dimension to them so if I was going to mail them, I would need to provide extra protection (and therefore postage) to keep them safe.  I don't plan on mailing them however, so we should be OK. Di

Graduation Cards for the Men in Your Life

Image
Good morning everyone.  I believe that I mentioned that the next little while was going to be pretty post heavy.  I wasn't kidding.  There has been a lot to post lately.  I've needed to spend lots of time in the craft area to get these projects done.  There are more to come so hang in there.  The card that I'm showing you today is for the men in your life.  Though it was designed to be a graduation card, you could easily use it as a card of encouragement for someone by simply modifying the inside. I made two variations of this card today by simply changing the paper.  I needed 3 cards and each piece of paper made 2, so I decided to make an extra just in case I forgot someone.  Here's what I used to get started: 3 Girl JAM - Cream crinkle ribbon from the Coffee bundle DCWV - Safari Chic 12X12 paper pad (2 sheets) Bazill - Green 12X12 paper and a piece of 12X12 brown paper from my stash Paper Trey Ink - Vintage Cream card stock (1 piece) Cricut - CTMH Art Philo

Operation Write Home Memorial Day Blog Hop

Image
Welcome to my little contribution to the Operation Write Home Blog Hop.  I am so happy that you stopped by today.  This is the first time that I've participated in an OWH Blog Hop, but I have hopped to other blogs during these hops before.  I can't wait to see all the inspiration out there. Today, I have chosen the Bonus Sketch #12 to use with this hop.  It is a sketch that my daughter chose to have me make her thank you notes for graduation before I even knew the hop details.  What perfect timing!  Be sure to scroll down to the previous post for a full tutorial and to see my daughter's thank you note.  Same technique and sketch, but a totally different card. I used the following supplies: Operation Write Home Bonus Sketch #12 K and Company - Ancestry.com paper Memento Tuxedo Black ink OWH / Hero Art stamp Stampendous - Happy Messages stamp set Thanks so much for stopping by today. Remember to take some time to enjoy the little things.  Have a

Thank You Notes - Tutorial for OWH's Memorial Day Bloghop

Image
Tomorrow (or today, depending on where you are located), there is a fun blog hop going on over at Operation Write Home.  I am really excited to be part of this fun hop and can't wait to hop along and see all the other inspiration.  The theme is "Thank You" and the challenge is to use an OWH sketch.  Did I say challenge?  OWH sketches actually simplify card making and are a great springboard for enhancing creativity.  I love them and use them often. This tutorial is actually for the hop.  However, there's a bit of a catch.  The tutorial is for one card and the card that I'm posting for the hop is going to be a bit different.  Same techniques - different results.  So be sure to check out both. For today's card I used the following supplies: Prima Leeza Gibbons "Wishes and Dreams" 12X12 cardstock Bazzill "Nougat" and cream cardstock Archival "Coffee" ink "Thank You" stamp from Stampendous "Hap

Graduation Autograph Book

Image
Hello.  Welcome to a new challenge at 3 Girl JAM.  This challenge is an Anything Goes with Ribbon challenge.  I love anything goes challenges so that I can link whatever project that I'm currently working on.  Be sure to play along with your projects for a chance to win some 3 Girl JAM ribbon.  I have provided a link in the right hand column so you can link up right from there or from the bottom of this post. Now for my project.  My daughter is graduating from high school next week.  She will be having a graduation ceremony with 2 other homeshooled students.  One of the things we will be doing is decorating a table in the colors of her choice.  One of the decorations we will have is a photo frame that people can autograph.  However, we realized that the frame won't provide much room for people to make comments so we decided to also have an autograph book on the table.  With the extra pages, she will be able to add photographs or journal some of her own memories of this spe

Wedding Card Time

Image
Today I have a special card to share with you.  One of my dearest friends has a daughter who is getting married.  Many years ago, I was a teacher's aid in a Christian school.  My friend was a co-worker and her 3 year old daughter was part of our kindergarten class.  Now this precious 3 year old is all grown up, graduated from college, and getting married.  Yep, I'm getting OLD. While designing the card, I realized that I have very limited stamps for wedding cards.  When this happens, its time to get creative with the stamps you have, right?  As you can see, you could also use this card for other occasions since it isn't "sentiment exclusive".  I have discovered that the "Dress White" from the new Navy bundle at 3 Girl JAM is the perfect color choice for a white wedding card.  You can find yours here . The main paper I chose is from the beautiful "Couture" 6X6 pad from SEI.  I also used paper from Paper Trey Ink. Embellishments are fr

Haul

Image
Today, I have a special haul to share with you.  As mentioned during the video, some of the things that I will be showing were bought particularly for special projects.  The next days will likely be pretty "post" heavy as I have several projects and a couple of post commitments due. Thanks for stopping by today.  Remember to take some time to enjoy the little things.

Birthday Cake Card

Image
I have a fun and busy card to show you today so hold onto your hats. I grabbed: Scrap of yellow paper from the Tim Holtz Coredinations Distress Pack Basic Grey "Life of the Party" 6X6 paper pad and epoxy stickers Tim Holtz "Tea Dye" distress ink CTMH stamps (from one of the Cricut bundles) Today's video is pretty short, so I hope you can take a few minutes to watch it   here . Thanks for stopping by.  Remember to take some time to enjoy the little things.

Memorial Day Weekend Blog Hop

Image
I am so excited to be announcing a Blog Hop that I plan to participate in next week.  It looks like there will be some great prizes and I'm sure the projects will be fabulous.  Mark your calendars and come and hop along.  If you have a blog and would like to participate, sign up by clicking on the image above.

Piles of Circles Cards

Image
Hello everyone.  I trust you are having a great day.  Today I have chosen a card that was inspired by another card.  Once again, I saw the original in a tutorial from Operation Write Home.  As soon as I saw this card, I loved the design and knew it would be a perfect use of scraps.  I made my design after looking at the picture once, so it obviously isn't an exact copycat.  I hadn't even looked at the original post so I don't know the sizes she used.  If you would like to check out the original post, please click here . If you watch the video, I focused on making the following card: At the end of the video I added a bonus card.  This is one of my favorite recent cards. I used the following supplies to make these 2 cards: Thank You - Scraps from My Mind's Eye - "Fine and Dandy" Martha Stewart - 1" circle punch Hero Arts - "All Occasion Messages" stamp set White embossing powder Versamark Ink Washi tape from Target Coredinations

Grid Birthday Cards

Image
Hello friends.  I trust you are having a good day.  After a bit of down time, I actually have a crafty post for you today.  Look for more to come.  I have counted the cards that I need to make to get caught up and I need 12 more birthday cards to catch me up to June 1st.  I also have 3 wedding cards and an unknown number of graduation cards and thank you notes to make. I used a sketch from Operation Write Home which can be found here .  I also used the following supplies: Hero Arts - Blessings to You stamp set My Mind's Eye - Fine and Dandy Paper pack Basic Grey Bloomers - Wander collection Memento Tuxedo Black Ink Coordinations "Krafty" cardstock Stampendous - Happy Messages stamp set If you are interested in the measurements and a quick tutorial, check out the video. Click here to view the video.   For some reason, I am having difficulty linking my video to this post. Thanks so much for stopping by. Remember to take some time to enjoy the little thing

Saying Goodbye

Image
Even as a child, I wasn't very good at saying goodbye.  When family from far away came to visit, the goodbyes were always tearful.  It was the same when we went to Grandma's house about 3 hours away.  I hated goodbyes and I still do.  To this day, it's not uncommon to send a loved down the road through blurry eyes.  It's just who I am. That was some good guacamole! On Friday, I said the hardest goodbye I have faced in my 40 years on earth.  I said goodbye to my mother-in-law.  I guess I should first explain that Friday was her memorial service.  I had actually told her goodbye for the last time more than a week before. I know it was a temporary goodbye, because I will see her again in Heaven someday.  It was none the less extremely painful, far more than I expected.  I am used to saying goodbye to loved ones as I have done so many times before.  I just wasn't ready to let her go. However, there are a few things that I know with 100% certainty: 1.  No mat